Xcode Cloud 為 React Native 跑測試:從 0 命令列建 UITest target
RN 專案預設沒有原生測試 target。一條已驗證的鏈路:命令列用 xcodeproj gem 建 UITest target → 本地跑 smoke 綠 → Xcode Cloud 加 Test action → 雲端首次跑通。以及 gem 不會自動設、Xcode GUI 會自動設的 3 個 build settings 大坑。
React Native 專案在 Xcode Cloud 裡跑測試,第一道坎不是 CI 配置,而是專案裡根本沒有原生測試 target。RN 預設生成的 iOS 工程只有一個 app target,連 scheme 裡的 Test Action 都可能指向一個不存在的 blueprint(孤兒引用)。所以你得先從 0 建一個 UI Test Bundle target,本地跑通 smoke,再讓 Xcode Cloud 的 Test action 跑它。
本文記錄一條已驗證的鏈路:命令列用 xcodeproj gem 建 UITest target(不用點 Xcode GUI)→ 本地跑 smoke 綠 → Xcode Cloud 加 Test action → 雲端首次跑通。以及建 target 過程中 gem 不自動設、而 Xcode GUI 會自動設的 3 個 build settings 大坑。
先診斷:你到底有沒有測試 target
別靠「Xcode 裡看著有」。直接查 project.pbxproj:
# 看 NativeTarget 有幾個
grep -c "isa = PBXNativeTarget" ios/YourApp.xcodeproj/project.pbxproj
# 看 scheme 的 TestAction 引用什麼
grep -A2 "TestAction" ios/YourApp.xcodeproj/xcshareddata/xcschemes/*.xcscheme
RN 專案預設只有 1 個 PBXNativeTarget(app),但 scheme 的 TestAction 裡可能掛著一個 BlueprintName = "YourAppTests"——對應的 target 已被 sanitize 或遷移刪掉,只剩引用。這就是孤兒:Xcode Cloud 的 Test action 一跑就報找不到 test target。
結論:從 0 建。
為什麼用命令列建 target(不用 Xcode GUI)
GUI 建最穩,但不可重現、不可版本控制。團隊裡第二個人、或換臺機器,又得點一遍。xcodeproj gem 能把「建 target」變成一個可提交的腳本,冪等、可 diff。
代價:gem 建出來的 target,有幾個 GUI 會自動設的 build settings 它不自動設——這就是後面 3 個坑的根源。
建 target(xcodeproj gem 腳本)
require 'xcodeproj'
project = Xcodeproj::Project.open('ios/YourApp.xcodeproj')

app = project.targets.find { |t| t.name == 'YourApp' }
abort 'app target 未找到' unless app

test = project.new_target(:ui_test_bundle, 'YourAppUITests', :ios, '15.1')
test.add_dependency(app)
test.build_configurations.each do |c|
  c.build_settings['PRODUCT_BUNDLE_IDENTIFIER'] = 'com.yourcompany.YourAppUITests'
  c.build_settings['TEST_TARGET_NAME']          = 'YourApp'      # UITest 要測的 app
  c.build_settings['DEVELOPMENT_TEAM']          = 'YOUR_TEAM_ID'
  c.build_settings['CODE_SIGN_STYLE']           = 'Automatic'
  c.build_settings['SWIFT_VERSION']             = '5.0'
end

# smoke 源檔案引用(物理檔案先建好)
group    = project.main_group.new_group('YourAppUITests', 'YourAppUITests')
file_ref = group.new_file('YourAppUITests.swift')
test.add_file_references([file_ref])
project.save

# scheme:test action = UITests,launch = app
scheme = Xcodeproj::XCScheme.new
scheme.add_build_target(test)
scheme.add_build_target(app)
scheme.add_test_target(test)
scheme.set_launch_target(app)
scheme.save_as('ios/YourApp.xcodeproj', 'YourAppUITests', true)關鍵點:TEST_TARGET_NAME 指向被測 app(UI test runner 要知道啟動哪個 app);用 :ui_test_bundle 而不是 :unit_test_bundle(UI 測試用前者)。
★ 大坑:gem 不自動設的 3 個 build settings
腳本跑完、pod install 完,一 xcodebuild test 就撞坑。GUI 建 target 時這 3 個 Xcode 自動填,gem 不會。
### 坑 1 · 缺 Info.plist → code sign 失敗
Cannot code sign because the target does not have an Info.plist fileGUI 建 target 時 Xcode 自動設 GENERATE_INFOPLST_FILE = YES(建置時合成 plist)。gem 不設,於是簽章找不到 plist,掛了。
c.build_settings['GENERATE_INFOPLST_FILE'] = 'YES'
c.build_settings['CURRENT_PROJECT_VERSION'] = '1'
c.build_settings['MARKETING_VERSION']       = '1.0'
### 坑 2 · RN codegen 腳本洩進 test target → 產物衝突
error: Multiple commands produce '.../YourAppUITests-Runner.app/PlugIns/YourAppUITests.xctest'原因:React Native 的 codegen 會往 target 塞 PBXShellScriptBuildPhase(啟動腳本)。gem 建的 test target 如果繼承到這個 phase,它和 test runner 預設的產物路徑打架,產物重複。
修:建完 target 後刪掉它上面混進來的 shell script build phase:
test.shell_script_build_phases.each { |p| test.build_phases.delete(p) }或直接在 pbxproj 裡把 test target 下 isa = PBXShellScriptBuildPhase 的段去掉。
### 坑 3 · PRODUCT_NAME 空 → .xctest 產物名錯
Multiple commands produce '.../PlugIns/.xctest' # 注意 .xctest 前面名字空了gem 建的 target 可能沒顯式設 PRODUCT_NAME,產物名落空。
c.build_settings['PRODUCT_NAME'] = '$(TARGET_NAME)' # 或顯式 'YourAppUITests'這三個坑是同一個根因:Xcode GUI 建目標時的「自動收尾」,gem 留給你手動。 跑一次 xcodebuild test,按報錯一個個補齊——補完就穩了。
smoke 測試:app 能啟動不崩
第一個 smoke 不測功能,只驗證鏈路:app 能在模擬器啟動、進了主螢幕、沒崩。
import XCTest

final class YourAppUITests: XCTestCase {
    func testAppLaunches() throws {
        let app = XCUIApplication()
        app.launch()
        let appeared = app.buttons.firstMatch.waitForExistence(timeout: 10)
            || app.staticTexts.firstMatch.waitForExistence(timeout: 5)
        XCTAssertTrue(appeared, "app 啟動後應有可互動元素")
    }
}
為什麼用 buttons.firstMatch || staticTexts.firstMatch:RN 首屏可能是純 JS 渲染,原生層第一幀可能沒 button,但一定有 text。給 10s+5s 雙重等待,覆蓋冷啟動。
Podfile:test target 塊
主 target 塊之後加:
target 'YourAppUITests' do
  inherit! :search_paths
end
inherit! :search_paths 讓 test target 只繼承主 target 的搜尋路徑(headers / frameworks),不重複 link pods——否則重複符號。然後 cd ios && pod install。
本地跑通
cd ios
xcodebuild test \
  -workspace YourApp.xcworkspace \
  -scheme YourApp \
  -destination 'platform=iOS Simulator,name=iPhone 15' \
  -only-testing:YourAppUITests
跑出 TEST SUCCEEDED = 本地鏈路 OK。
雲端:Xcode Cloud 加 Test action
1. App Store Connect → 你的 app → Xcode Cloud → workflow(監 master/分支) 2. Actions 區加一個 Test action(已有的 Archive action 保留) 3. 配置: - Scheme 選你的 UITests scheme(不是 app scheme——後者的 Test Action 是孤兒引用,跑不了) - Destination:iPhone 模擬器 - Environment:先不加任何東西(只跑 smoke) 4. Save
⚠️ 關鍵:加 Test action 之前 push 觸發的 build 只跑 Archive。必須加完 Test action 後再觸發一次新 build,才會跑 test。已 in-flight 的 build 不會補跑。
結果
首次帶 Test action 的雲端 build:TEST SUCCEEDED,連同 Archive 總耗時約 7 分鐘。Xcode Cloud 的 Test action 只跑 XCTest / XCUITest(原生層),不跑 jest——RN 的 JS 單測要另配(例如用 GitLab CI 的 jest job 並行跑)。
實測:4 個模擬器並行,smoke 全綠
把這條鏈路在一個真實 RN 專案上跑通:UITest scheme 的 TestAction 配 Release configuration,smoke 用例 testAppLaunches 只驗 app 起得來不崩。push 後 Xcode Cloud 自動觸發,Test action 在 4 個 destination(iPhone SE / 16 / 16 Pro / 16 Pro Max)並行跑,全綠。
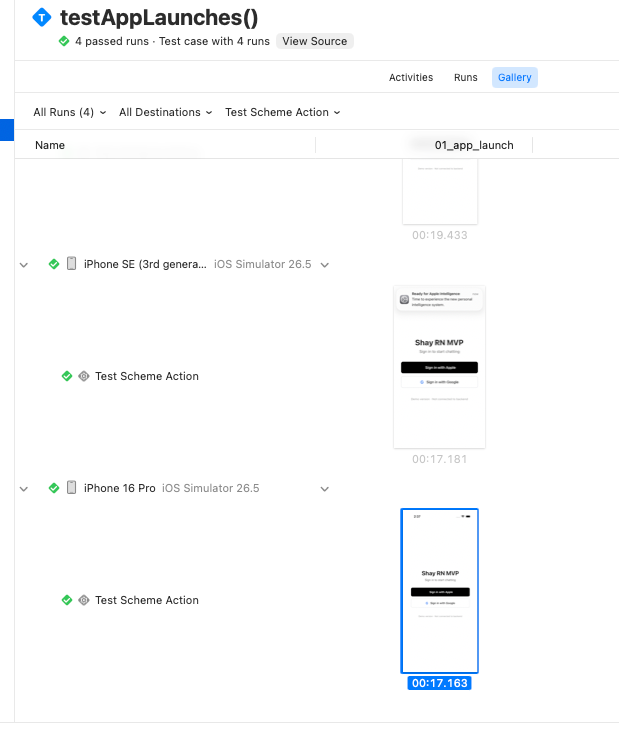
三個實測踩到的非顯然點:
- Release configuration 在 Cloud 上能跑 UITest。本地真機用 Release 會撞
test bundles not available in Release configuration,但 Xcode Cloud 的 build-for-testing / test-without-building 分離模式沒事,TestAction 直接配 Release 即可。 - 截圖預設不留,得顯式保活。XCTest 的 attachment 預設
.deleteOnSuccess——測試一過就清,出現「過了但無圖」。改成.keepAlways才會進 .xcresult,Gallery 標籤和 Xcode Organizer 才看得到。 - 截圖不在 Artifacts 標籤。Artifacts 只列打包產物(Logs / Test Products / .xcresult.zip),attachment 是 .xcresult 包內資源。看它要去 Tests → Gallery,或下載 .xcresult 用
xcrun xcresulttool export attachments匯出。
進階:用環境變數門控 BDD
smoke 是基線,每次都跑。但真機 BDD(UI 互動、業務流程)耗時長、佔配額,不該每次 build 都跑。約定用環境變數門控:
import XCTest

final class YourAppBDDTests: XCTestCase {
    func testLoginFlow() throws {
        // BDD 套件用 RUN_BDD 門控;smoke 不門控(基線層永遠跑)
        try XCTSkipIf(ProcessInfo.processInfo.environment["RUN_BDD"] != "true",
                      "BDD 跳過(預設省配額,要跑加 RUN_BDD=true)")
        // ... 真實 BDD 步驟
    }
}
雲端 workflow 的 Environment 預設不設 RUN_BDD(每次只跑 smoke);要驗證互動/業務時臨時加 RUN_BDD=true 觸發一次。配額花在刀刃上。
除錯 checklist
Cannot code sign ... does not have an Info.plist→ 設GENERATE_INFOPLST_FILE = YESMultiple commands produce ...-Runner.app/PlugIns/...xctest→ 刪掉 test target 上的 codegenPBXShellScriptBuildPhaseMultiple commands produce .../PlugIns/.xctest(名字空)→ 設PRODUCT_NAME- Test action 報找不到 test target → scheme TestAction 是孤兒引用,建新 UITests scheme 並選它
- 雲端 build 沒跑 test → 加 Test action 後沒重新觸發 build(舊 build 不補跑)
- 模擬器 destination 找不到 → 用雲端映像實際有的型號(如
iPhone Air),別用剛發布、映像還沒更的型號 xcodebuild test編譯很久 → RN 全量編譯首次約 10 分鐘,正常,轉後臺等