Xcode Cloud で React Native のテストを走らせる:UITest target をゼロから CLI で作る
RN プロジェクトはデフォルトでネイティブのテスト target を持たない。検証済みのパス:CLI の xcodeproj gem で UITest target を作る → ローカルで smoke が通る → Xcode Cloud に Test action を追加 → クラウドで初回成功。さらに gem が自動設定せず、Xcode の GUI が自動設定する 3 つの build settings の落とし穴。
React Native プロジェクトが Xcode Cloud でテストを走らせる際、最初の壁は CI の設定ではなく、プロジェクトの中にネイティブのテスト target がそもそも存在しないことだ。RN がデフォルトで生成する iOS 工程には app target が 1 つあるだけで、scheme の Test Action さえ存在しない blueprint を指している可能性がある(孤児参照)。だから、まず 0 から UI Test Bundle target を作り、ローカルで smoke を通し、それから Xcode Cloud の Test action に走らせる、という手順になる。
本記事は検証済みのルートを記録したものだ:コマンドラインから xcodeproj gem で UITest target を作る(Xcode の GUI をクリックしない)→ ローカルで smoke を緑にする → Xcode Cloud に Test action を追加する → クラウドで初回通過。さらに、target 作成の過程で gem が自動設定しない一方で Xcode GUI が自動設定する 3 つの build settings の大きな罠についても触れる。
まず診断:テスト target が本当にあるか
「Xcode 上に見える」を当てにしないこと。project.pbxproj を直接調べる:
# NativeTarget がいくつあるか
grep -c "isa = PBXNativeTarget" ios/YourApp.xcodeproj/project.pbxproj
# scheme の TestAction が何を参照しているか
grep -A2 "TestAction" ios/YourApp.xcodeproj/xcshareddata/xcschemes/*.xcscheme
RN プロジェクトはデフォルトで PBXNativeTarget が 1 つ(app)しかないが、scheme の TestAction には BlueprintName = "YourAppTests" がぶら下がっているかもしれない——対応する target は sanitize やマイグレーションで削除されており、参照だけが残っている。これが孤児だ:Xcode Cloud の Test action が一度走ると、test target が見つからないと報告される。
結論:0 から作る。
なぜコマンドラインで target を作るのか(Xcode GUI を使わない)
GUI で作るのが最も安定だが、再現できず、バージョン管理もできない。チームの二人目や別のマシンでは、また一からクリックし直しになる。xcodeproj gem を使えば「target を作る」をコミット可能なスクリプトにでき、冪等で diff も取れる。
代償:gem が作った target は、GUI なら自動で設定される build settings のいくつかを自動設定しない——これが後述する 3 つの罠の根源だ。
target を作る(xcodeproj gem スクリプト)
require 'xcodeproj'
project = Xcodeproj::Project.open('ios/YourApp.xcodeproj')

app = project.targets.find { |t| t.name == 'YourApp' }
abort 'app target が見つかりません' unless app

test = project.new_target(:ui_test_bundle, 'YourAppUITests', :ios, '15.1')
test.add_dependency(app)
test.build_configurations.each do |c|
  c.build_settings['PRODUCT_BUNDLE_IDENTIFIER'] = 'com.yourcompany.YourAppUITests'
  c.build_settings['TEST_TARGET_NAME']          = 'YourApp'      # UITest がテストする app
  c.build_settings['DEVELOPMENT_TEAM']          = 'YOUR_TEAM_ID'
  c.build_settings['CODE_SIGN_STYLE']           = 'Automatic'
  c.build_settings['SWIFT_VERSION']             = '5.0'
end

# smoke のソースファイル参照(物理ファイルは先に作っておく)
group    = project.main_group.new_group('YourAppUITests', 'YourAppUITests')
file_ref = group.new_file('YourAppUITests.swift')
test.add_file_references([file_ref])
project.save

# scheme:test action = UITests、launch = app
scheme = Xcodeproj::XCScheme.new
scheme.add_build_target(test)
scheme.add_build_target(app)
scheme.add_test_target(test)
scheme.set_launch_target(app)
scheme.save_as('ios/YourApp.xcodeproj', 'YourAppUITests', true)ポイント:TEST_TARGET_NAME は被テスト app を指す(UI test runner はどの app を起動するか知る必要がある)。:unit_test_bundle ではなく :ui_test_bundle を使うこと(UI テストには前者を使う)。
★ 大きな罠:gem が自動設定しない 3 つの build settings
スクリプトを実行し、pod install を済ませ、xcodebuild test を一回走らせると罠にぶつかる。GUI で target を作る際に Xcode が自動で埋めるこの 3 つを、gem は埋めてくれない。
### 罠 1 · Info.plist 不足 → code sign 失敗
Cannot code sign because the target does not have an Info.plist fileGUI で target を作る際、Xcode は自動的に GENERATE_INFOPLST_FILE = YES を設定する(ビルド時に plist を合成する)。gem はこれを設定しないため、署名が plist を見つけられず、落ちる。
c.build_settings['GENERATE_INFOPLST_FILE'] = 'YES'
c.build_settings['CURRENT_PROJECT_VERSION'] = '1'
c.build_settings['MARKETING_VERSION']       = '1.0'
### 罠 2 · RN codegen スクリプトが test target に混入 → 成果物の衝突
error: Multiple commands produce '.../YourAppUITests-Runner.app/PlugIns/YourAppUITests.xctest'原因:React Native の codegen は target に PBXShellScriptBuildPhase(起動スクリプト)を差し込む。gem が作った test target がこの phase を引き継ぐと、test runner のデフォルトの成果物パスと喧嘩して、成果物が重複する。
修正:target を作った後、紛れ込んだ shell script build phase を削除する:
test.shell_script_build_phases.each { |p| test.build_phases.delete(p) }あるいは pbxproj の中で、test target 配下の isa = PBXShellScriptBuildPhase のセクションを直接取り除く。
### 罠 3 · PRODUCT_NAME が空 → .xctest 成果物名が不正
Multiple commands produce '.../PlugIns/.xctest' # .xctest の前の名前が空いていることに注意gem が作った target は PRODUCT_NAME を明示的に設定しないことがあり、成果物名が空になる。
c.build_settings['PRODUCT_NAME'] = '$(TARGET_NAME)' # あるいは明示的に 'YourAppUITests'この 3 つの罠の根因は 1 つ:Xcode GUI が target 作成時に行う「自動の仕上げ」を、gem は手作業に任している。 xcodebuild test を 1 回走らせ、エラーに従って 1 つずつ補う——揃えば安定する。
smoke テスト:app が起動して落ちないこと
最初の smoke は機能をテストせず、ルートだけを検証する:app がシミュレータで起動し、メイン画面に入り、落ちないこと。
import XCTest

final class YourAppUITests: XCTestCase {
    func testAppLaunches() throws {
        let app = XCUIApplication()
        app.launch()
        let appeared = app.buttons.firstMatch.waitForExistence(timeout: 10)
            || app.staticTexts.firstMatch.waitForExistence(timeout: 5)
        XCTAssertTrue(appeared, "app 起動後にインタラクション可能な要素が存在するべき")
    }
}
buttons.firstMatch || staticTexts.firstMatch を使う理由:RN の最初の画面は純 JS レンダリングの可能性があり、ネイティブ層の最初のフレームには button がないかもしれないが、text は必ずある。10s+5s の二重待機を設けてコールドスタートをカバーする。
Podfile:test target ブロック
メインの target ブロックの後に追加する:
target 'YourAppUITests' do
  inherit! :search_paths
end
inherit! :search_paths により、test target はメイン target の検索パス(headers / frameworks)だけを継承し、pods を重複してリンクしない——そうしないとシンボルが重複する。その後 cd ios && pod install。
ローカルで通す
cd ios
xcodebuild test \
  -workspace YourApp.xcworkspace \
  -scheme YourApp \
  -destination 'platform=iOS Simulator,name=iPhone 15' \
  -only-testing:YourAppUITests
TEST SUCCEEDED が出れば、ローカルルートは OK。
クラウド:Xcode Cloud に Test action を追加
1. App Store Connect → 対象 app → Xcode Cloud → workflow(master/ブランチを監視) 2. Actions 欄に Test action を追加(既存の Archive action はそのまま残す) 3. 設定: - Scheme は自分の UITests scheme を選ぶ(app scheme ではない——後者の Test Action は孤児参照で、走れない) - Destination:iPhone シミュレータ - Environment:まずは何も追加しない(smoke だけ走らせる) 4. Save
⚠️ 重要:Test action を追加する前に push で発火した build は Archive だけを走らせる。test が走るには、Test action を追加した後に新しい build をもう一度発火させる必要がある。既に in-flight の build が後から走ることはない。
結果
Test action を初めて付けたクラウド build:TEST SUCCEEDED、Archive と合わせた総所要時間は約 7 分。Xcode Cloud の Test action は XCTest / XCUITest(ネイティブ層)だけを走らせ、jest は走らない——RN の JS 単体テストは別途設定が必要(例:GitLab CI の jest job で並列に走らせる)。
実測:4 つのシミュレータで並列、smoke 全緑
このルートを実際の RN プロジェクトで通した:UITest scheme の TestAction に Release configuration を設定し、smoke 用例 testAppLaunches は app が起動して落ちないことだけを検証する。push 後、Xcode Cloud が自動発火し、Test action は 4 つの destination(iPhone SE / 16 / 16 Pro / 16 Pro Max)で並列に走り、すべて緑。
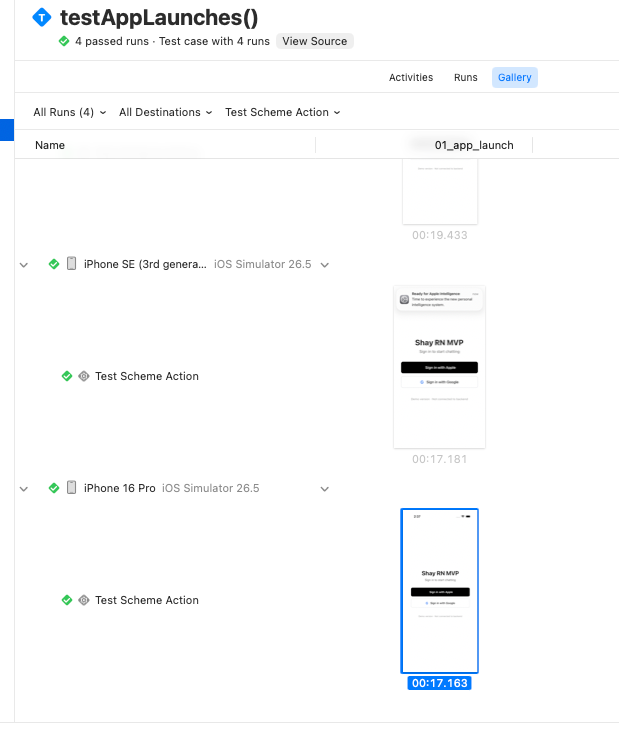
実測で踏んだ、自明でない点が 3 つ:
- Release configuration でも Cloud 上なら UITest が走る。ローカルの実機で Release を使うと
test bundles not available in Release configurationにぶつかるが、Xcode Cloud の build-for-testing / test-without-building の分離モードなら問題ない。TestAction には直接 Release を設定してよい。 - スクリーンショットはデフォルトでは残らない、明示的に保持させる必要がある。XCTest の attachment はデフォルトで
.deleteOnSuccess——テストが一度通ると消去され、「通ったのに画像がない」事態になる。.keepAlwaysに変えて初めて .xcresult に入り、Gallery タブや Xcode Organizer で見えるようになる。 - スクリーンショットは Artifacts タブにはない。Artifacts にはパッケージ成果物(Logs / Test Products / .xcresult.zip)しか並ばない。attachment は .xcresult バンドル内部のリソースだ。見るには Tests → Gallery に行くか、.xcresult をダウンロードして
xcrun xcresulttool export attachmentsでエクスポートする。
応用:環境変数で BDD をゲートする
smoke はベースラインで、毎回走らせる。だが実機 BDD(UI インタラクション、業務フロー)は時間がかかり、クォータを消費するため、毎 build で走らせるべきではない。環境変数でゲートするのが慣例だ:
import XCTest

final class YourAppBDDTests: XCTestCase {
    func testLoginFlow() throws {
        // BDD スイートは RUN_BDD でゲート、smoke はゲートしない(ベースライン層は常に走る)
        try XCTSkipIf(ProcessInfo.processInfo.environment["RUN_BDD"] != "true",
                      "BDD スキップ(デフォルトでクォータ節約、走らせるなら RUN_BDD=true を追加)")
        // ... 実際の BDD ステップ
    }
}
クラウドの workflow の Environment にはデフォルトで RUN_BDD を設定しない(毎回 smoke だけ走る)。インタラクション/業務を検証したい時に、一時的に RUN_BDD=true を追加して一度だけ発火させる。クォータを刃に使う。
デバッグ checklist
Cannot code sign ... does not have an Info.plist→GENERATE_INFOPLST_FILE = YESを設定Multiple commands produce ...-Runner.app/PlugIns/...xctest→ test target 上の codegen のPBXShellScriptBuildPhaseを削除Multiple commands produce .../PlugIns/.xctest(名前が空)→PRODUCT_NAMEを設定- Test action が test target 見つからないと報告 → scheme の TestAction が孤児参照。新しい UITests scheme を作ってそれを選ぶ
- クラウドの build が test を走らせない → Test action 追加後に build を再発火していない(古い build は後から走らない)
- シミュレータの destination が見つからない → クラウドのイメージに実際にある機種(
iPhone Airなど)を使う。発表されたばかりでイメージにまだ反映されていない機種は使わない xcodebuild testのコンパイルが長い → RN のフルコンパイルは初回約 10 分。正常。バックグラウンドに回して待つ